Sink Cutouts: “One Sink -- One Holeâ€
Since the very first fabricator was instructed to cut a hole for a sink opening in a perfectly good piece of stone, I would think that the poor person stuck making that hole (maybe they were doing a job for Caesar in one of his villas in Rome) had this gnawing worry in the back of their mind of, “What if I screw this up?†Moreover, I'm sure that the apprehension that very first fabricator experienced hasn't changed much over the ages. In fact, I would venture to say that any fabricator who cares about what their final product looks like, still gets a little twinge of anxiety now and then -- especially when the stone is something like Azul Bahia or they know that “there are no more slabs like this one left to work with.â€
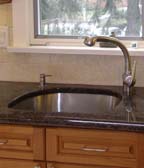
I'm sure that we can all agree that the act of making a hole in stone for an undermount, self-rimming or vessel sink is pretty much a straightforward process. What gets my cookies fried is when the sink cutout is done wrong, and has to be done again. I absolutely hate doing something twice (that should have been done only once).
In the time that I served my country in the military, I learned the motto of “One Shot -- One Kill†that is the vanguard of the U.S. Army Sniper School. I think a modified version can be applied to sink cutouts: “One Sink -- One Hole.†With that said, I not only want to review the different methods that are popular in making a sink cutout, but additionally, I want to review some stop-gap type processes that fabricators should be doing to ensure that they are only doing the sink cutout once.

Equipment and tooling
Unless you've been living under a rock for the last decade, you would have to agree that the preferred “weapon of choice†(for most fabricators starting out) in the battle to sculpt the perfect sink opening is the good old 4-inch grinder. Generally, whether it is 2-cm or 3-cm stone, the 4-inch (or in some cases 5-inch) diamond blade will make pretty short work of cutting through the stone. In some cases, fabricators that want to step up their technique will employ more “sophisticated†methods of producing the same opening. Most fabricators that travel this route (after tiring of the hand-held 4-inch grinder with the 4-inch diamond blade) step up to using either a router, or surface polisher and thick plastic templates as a guide to making the initial hole shape of the sink cutout.
As I travel around the country and visit numerous natural stone fabrication shops, I have noticed a trend in equipment “ensembles†that tend to be the same wherever I go. When a fabricator gets to the point where they are going to make an investment in “equipment,†it seems that they purchase the same three-piece group: a bridge saw, an edge polishing machine and a surface polisher. It's a great trio of machines to take a fabricator to the next level.
Adapting the surface polisher
I always notice that the machine that seems to get the least amount of use is the lonely surface polisher. It sits in the corner and hopes a piece of stone will break and get glued back together. Then the repaired piece can be placed on its bed, allowing the surface polisher to grind, hone and re-polish the once-fractured piece and make it look like new again.A number of resourceful fabricators, though, have taken the advice of the many surface polisher manufacturers and employed their machines to do more than just repair broken pieces via surface polishing. A surface polisher can be adapted to cut sink openings and polish the finished product. As I said earlier, utilizing thick plastic templates as guides and the proper bits, you can produce a professional-looking sink opening. In addition, as long as you have the piece set up, you can core out the faucet and soap dispenser holes in your shop too. This eases the workload on your installers by pre-cutting the holes at the surface polishing station. For many shops, the answer to speeding up the sink cutout process is implementing the use of their surface polishers as a sink cutout station. For the shop that does not have a CNC, this approach makes total sense. The only thing keeping some shops from realizing how easy it is to do sink cutouts using this method, is that they simply don't want to try.
On a smaller scale, many routers that are initially set up to do nothing but edge profiling, can also be rigged to do sink cutouts. For the fabricator who can't quite make the investment in a surface polisher, but wants to create a more refined sink cutout, the router approach is the answer for folks that are on a tighter budget than others. Just make sure that you do your homework before you lay down your hard-earned cash, because not all routers are created equal.
I think that we can all agree that the “king†of doing sink cutouts with finesse and accuracy is the shop that runs their sink openings on their CNC machine. With a good operator that understands the uses and limitations of diamond tooling, a gorgeous sink cutout can be done in about an hour or so.
Why are mistakes made?
So how do sink cutouts get screwed up? Why do we make the mistakes that we do when it comes to simply making a hole in a piece of stone? From my experience, it's my opinion that we sometimes loose our focus, maybe caused by repetition of our daily tasks, or perhaps because we simply get distracted for whatever reason. So then you may ask, “How do I keep from doing a sink cutout twice?â€First and foremost is attention to detail. This may seem like a no-brainer to some, but I think it bears review. The process starts by confirming the sink type and style with the owner, builder or designer. If there are multiple sinks, make sure that you catalogue the location of each sink. This is especially true when it comes to the popular stainless steel sinks that are set side by side, with one sink being larger than the other. Which side does the big one go on? Where does the “veggie†sink go, and if the sinks are rectangular, which way do they get set? Some fabricators are happy to “guess†because they don't want to rock the boat, or slow down the fabrication process. Others “assume,†and we all know the adage about people who assume…
I'm sure that you've gotten the request of “Can't you just make the hole with the dimensions the supplier provided?†Of course, but then if the hole does not fit the sink, do you think that the supplier of those “dimensions†will cheerfully step up and volunteer to not only buy another slab, but pay you for the sink cutout to be done a second time? Obviously, they won't. The responsibility of getting the “One Sink -- One Hole†concept of doing sink cutouts starts with you as the fabricator. You need to put your arms around the task and make sure that you have all of the pertinent data to pinpoint where each cutout needs to be done, and the total number of cutouts. You can never rely on partial information from your clients, or even worse, let yourself be put in a position where you are asked to “use your best judgment because you're the expert, and we trust you.†We have all heard that too many times.
Plan ahead
Here is a process that has worked for me. Start with the pre-templating process, when your salesperson or project manager is putting your work orders together. Identify on a copy of the floor plan (that should go along with the templater for easy reference) where any undermount sinks and any self-rimming sinks are to be installed. Include the model number, the style (undermounted for self-rimming) and material type (cast iron, stainless steel, composite, porcelain, etc.) Make sure that your client knows (far in advance of the template date) that it's their responsibility to have the sinks on the jobsite for your templater to bring back to your shop. Or have your client deliver the sinks directly to your shop. One thing to remember though: once you drive somewhere (such as a distributor) to pick up the sinks, you'll find that you'll always be picking up the sinks for that particular client. Your time is more valuable than for you to be a courier. Let your client do the legwork for you. Put the onus on your client to get you everything you need to know about the project, so you only have to fabricate it one time.When your templaters are doing their jobs, make sure that they not only mark the centerline of where the sink should go, but have them also write the type of sink on the template. Next, have them show on the template where the two side walls of the base cabinet should be, and where the back wall of the cabinet base is.
Another exercise that takes a little more time, but helps reduce the possibility for error, is marking each sink box -- on all six sides. What should be listed on the sink box is: job name, job number (if applicable), location of where the particular sink is to be installed, template number that the sink corresponds to, and the order of which sink it is (1 of 6, 3 of 9, 2 of 2, etc).
I recently heard of a fabricator that was putting a particular brand of bath lavatory sink in a granite top. Every thing seemed fine until they realized that the cabinet base was too shallow from the front edge of the stone to the back wall to accommodate the sink cutout, holes for faucets, and still have enough room for a piece of 3-cm backsplash to be installed. The sad part in this was that the entire episode could have been avoided, had their templater marked the cabinet base info on the template. Had that happened, the shop personnel would have been able to stop the cutting process, because they would have realized (by visualizing) that the sink was too big for the cabinet base. Unfortunately, they realized this on the day of install (in front of the nit-picking customer). They not only had to re-fabricate the tops, but they really made themselves look like a bunch of rank amateurs in the eyes of their angry (by now) customer and their builder as well.
Many fabricators that have learned their lessons the hard way, now use a series of checklists that are implemented at various stages of fabrication. Another priceless method of insuring that the sink cutout is done right the first time, is to use a quality control system. This can be as simple as making sure that before a sink cutout is started, the person doing the hole stops to get a supervisor, and has the supervisor check over the info, looking for anything that does not match up with what is supposed to be done. Another technique that has saved me many times over, is to make sure your shop personnel know that if they ever are not sure, they should stop. I always want them to know that they'll never get in trouble for caring about their work and being careful when it comes to sink cutouts. We usually only get one chance to do it right. They always say that two heads are better than one, and in the end, insuring that you have the right information will only help to guarantee that each sink will be a “One Hole -- One Sink†cutout.
Looking for a reprint of this article?
From high-res PDFs to custom plaques, order your copy today!


