Products and features that add discernable and lasting levels of luxury to new home construction and remodeling projects have been gaining in popularity among home-owners. In particular, functional luxuries that enhance the homeowner's level of personal comfort and enjoyment of his/her surroundings, while simul-taneously imparting “wow” appeal to the home itself.

One of the luxuries that has been growing in popularity among homeowners and design professionals is the inclusion of electric floor warming in bathrooms and popular family gathering and entertaining spots, such as kitchens, family rooms and sunrooms. Spurred on by the relatively recent introduction of the new easy-to-install roll- and mat-based warming systems, floor warming is rapidly becoming a “must have” for anyone in the process of installing tile and stone floors. Obviously, most homeowners would prefer to step out of a shower or bath onto a soothing, pre-warmed stone floor, making floor warming an easy up-sell for tile and stone floors in all areas of the country.

Keeping the installer in mind

The new ultra-thin electric systems are designed to be installed on top of the sub-floor and directly beneath the stone tiles. In these cases, a mesh backing allows the system to be quickly laid out and affixed to the sub-floor by the tile contractor immediately prior to installation of the actual stone tiles. There is no need for a heating specialist, and most installations can be completed by a tile installation pro the first time -- without any prior training.

Unlike hydronic radiant floor heating systems, which are typically used in whole-building new construction heating applications, electric systems offer the flexibility to be added to individual rooms throughout the house. They can be installed where and when they are desired, as long as the system is in tandem with a new floor covering installation or the replacement of an existing floor.

Both roll and mat systems come with power leads that are connected back to a thermostat or other control for final system power hook-up. As such, it is recommended that final electrical work be performed by a qualified, licensed electrician.

Of the three forms of electric floor heating systems (cable, rolls and mats), the roll system appears to be the favorite among flooring installers, combining ease of installation with the ability to be fitted quickly around permanent fixtures such as tubs, shower stalls, vanities and cooking islands. A tight fit can be an important feature for a homeowner, as heat does not travel far beyond the boundaries of the system. Fitting of the roll system is achieved through a simple process that involves cutting the fiberglass mesh backing to which the heating cables are affixed. After this, the installer conducts a series of turns and flips to cover any floor area and shape.

One major benefit of electric floor warming is its cost-effective operation. The energy consumed by a system warming an average bathroom floor is similar to that required to power a standard light bulb. To warm a generously sized bathroom will cost less than 15 cents a day with a full three-hour “on” cycle. Because 100% of the energy consumed by a system goes into producing heat, there is no venting of unburned gases or particulates into the atmosphere, as with traditional heating systems.

Those unfamiliar with electric floor warming will find a wealth of information readily available from industry manufacturers and associations. Larger companies offer online information resources, installation videos and installer certification programs.

Best installation practices

When installing stone over an electric floor warming system, a few things should be considered to ensure a successful installation:

  • First things first: The system should always be tested with an ohmmeter to ensure that it is functioning correctly prior to the installation of the stone. With the use of an ohmmeter, there is never any need to power up the system to ensure it is working correctly as doing so may negatively affect the adhesive/installation materials.

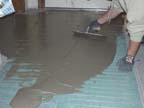
  • Keeping it real: A stone tile floor installation requires a flat and level surface. After applying the electric floor warming system to the substrate, there are multiple methods that may be used to prepare a proper surface to receive the stone installation. One method is to apply a self-leveling underlayment with primer to float over the electric floor warming system. Another option is to use a latex-fortified thin-set mortar to fill in and around the floor warming system, in effect, encapsulating the entire system. The key is to get the leveling and encapsulating mortar as flat and level as possible. Usually, incorporating a self-leveling underlayment offers the easiest way to accomplish this.

  • A little attention to detail: Installers need to be careful that their trowels and other tools do not cut or nick the electric floor warming system. After the leveling/encapsulation mortar has hardened, a membrane may be installed. The use of an appropriate membrane is another good practice. If the installation is in a wet area, a waterproofing membrane should be used. An added benefit of using a waterproofing membrane is that many of these products also act as anti-fracture membranes. If a waterproofing membrane is not used, an anti-fracture membrane should always be given consideration.

  • Built to last: When installing the stone, it is good practice to use a latex-fortified, thin-bed adhesive mortar to deal with the greater probability of expansion and contraction that the installation can undergo. Always honor expansion joints that may exist in the substrate and bring them through the stone finish. Movement joints should also be placed at the perimeter of the installation, as well as in the field.

  • Consult the experts: As a rule of thumb, follow the guidelines outlined in the Handbook for Tile Installations (NATC) Expansion Joint Detail EJ171. Although this is a Tile Industry publication, the Marble Institute of America also points back to this detail in its installation manual.

  • Last but not least: Use a suitable flexible sealant that is non-staining and will hold up to the traffic and maintenance that the area will endure. Note that most acrylic-type colored caulks are not suitable for these installations.

  • As the finishing touch, the grout used should really complement the stone installation. If a portland cement-based grout is chosen, use a high-quality product. For even better performance, there are new types of grouts that can be used with stone that will not experience all of the typical inherent problems that are associated with portland cement-based grouts. Some of these products include a unique cross-linking technology grout and various epoxy-based grouts. Check with your adhesive and membrane manufacturer for a compatible membrane, adhesive and grouting system that is backed up with a comprehensive warranty.