
Figure 1
Sinai Marble & Granite has continually been striving to fine tune our fabrication and develop systems that will make us more efficient, produce better quality and leave less room for error. As part of this search, we have found that using a template for sink cutouts produces a very even sink reveal. At the same time, it makes a sink cutout so simple that you’ll even let the new guy do it.

Figure 2

Figure 3

Figure 4
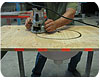
Figure 5
To create a positive reveal, in which the top lip of the sink is exposed, we must take the template-creation process one step further. We use the rabbeting router bit and bearing set. First, select and install a bearing that will give you the proper amount of reveal. For example, if you want a fine positive reveal of 1/8 inch, you would select the bearing that is 1/8 inch smaller than the diameter of the rabbeting bit (Figure 6). Second, set the depth on the router to cut halfway into the thickness of the template. Then make a pass all the way around the template. Then you flip the template upside down. Install the flush cutting bearing and make a second pass all the way around.

Figure 6


