As homeowners continue to look for countertop materials made from exotic stone materials, fabricators are being asked to work with fragile materials more than ever before. This past spring, skilled stoneworking professionals at Cadenza Granite & Marble, Inc. in Concord, NC, detailed all of the various steps that can be required when processing a Rainforest Brown marble countertop. This educational session was part of a workshop by the Stone Fabricators Alliance.

Rodding the workpiece
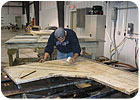
After the workpieces were cut to size on the bridge saw, the first step in the “protection” process was to rod the back of the stone. Grooves were cut into the stone in an “omni-directional” manner, and they ran as close as 1 inch from the edge of the countertop. A total of two rods were inserted in front and back of the sink cutout, and one rod was inserted in front and back of the cook cut-out. The grooves were then filled with Bonstone Touchstone epoxy, and reinforced with steel rods, which can be as long as 3 to 4 feet in size. According to Ron Hannah of Cadenza, the company had been using tempered steel for this purpose, although it was switching to stainless steel. “It goes to a long-term liability issue,” he said. “Ultimately, the faucet may leak, which could cause spalling [of tempered steel.]”After the steel rods are inserted, a propane torch was used on the workpiece. “You have to keep it moving, or the rod or stone can pop,” Hannah said. “You want to dry it, but not overheat it.”
Transporting the material
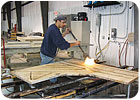
Once the rods are in place, workers attached a bar clamp system - specifically, the Sink Hole Saver from Omni-Cubed, Inc. - to the straight edges of the workpieces. A team of workers then used a vacuum lifter to lift the pieces, and they carefully positioned it on the CNC stoneworking center by hand.After the material received its final hand polish, the bar clamp system was again used when lifting the workpieces onto the delivery truck. The pieces were transported using a vacuum lifter, and the bar clamp system remained on the workpieces during delivery to the jobsite.
Microcrack repair
Even with the proper reinforcement and handling procedures in place, microcracks are common when working with extremely fragile materials. Very often, these resulting microcracks are similar to the natural microfractures that can be found in the stone slabs before they are processed/reinforced at the overseas slab-processing plants.In repairing the microcrack, the surface of the stone was first dried using the propane torch, and a complete repair was executed by Donny Taylor of the SFA.
Taylor first poured a two-part “super glue” - Axson/Wood & Stone Co. Acrylic Super Penetrating adhesive - into the crack. Using a paper cup, the adhesive was poured in a very thin stream, and then he lightly pounded the sides of the crack. “The vibration helps the product work into the crack,” Taylor explained. The area of the crack was first smoothed using a tongue depressor, and then the excess was removed using a razor blade.
Because the surface of the Tropical Brown marble did not have a highly polished finish, top polishing of the crack would be minimal. However, the re-polishing process did require several steps using a hand grinder and electro-plated pads from GranQuartz, which are outlined as follows:
1. Begin with the 120-grit pad. “With light lippage, there’s no need for the 60-grit pad,” Taylor said. “It’s really something you want to avoid.” Begin by operating the grinder at 600 rpm and work back and forth, keeping the pad flush against the surface without excessive pressure.
2. Follow with the 220-grit pad, followed by 400-grit and 600-grit. “You are going a bit wider [from the crack] every time,” Taylor said. “This helps it to blend.”
3. Finally, use the 800-grit pad and increase the grinder’s speed to 800 rpm. “You are running wet to dry with a little more pressure,” Taylor said. “You want to hold it steady and stable, with just enough pressure to know that it is flat without bouncing.”
Taylor cautioned, however, that while the above sequence was suited for this specific repair, each case may be different. “Every repair is going to be trial and error,” he said. “Stones like Crema Marfil would have required an additional step of using a white buff “hogs hair” pad.”
Another consideration is how the pads will work on the various materials. “You keep working until you get it. You really need to get a feel for the tool and each pad. When you feel it grabbing, you know that it’s working. And when it feels more like it’s slipping across the surface, you know that it’s done.”
