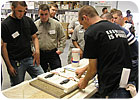
This past spring, stone fabricators from around the country gathered at Cadenza Granite & Marble Inc. in Concord, NC, for a Stone Fabricators Alliance (SFA) Workshop. As part of the extensive program, two SFA members offered a hands-on demonstration of their techniques for seam setting and top polishing.
Seam setting
The demonstration on seam setting was led by Donny Taylor, who began by leveling the two pieces using shims. “Obviously, you want to make it as flat as possible, which will make the top polishing easier,” he said. “Don’t just rely on top polishing; remove the lippage first.”The pieces were secured together using a Gorilla Grip clamping system, that allows the seam to be quickly opened or closed using the roller nut. The system has an electric vacuum pump to allow for clamping of the pods.
To further level the two pieces, Taylor attached cams to the seam setter. “You can use a razor blade to tell which end is higher, and the cams will help it get level,” he said. “It is important to remember, though, that the cams can get glue on them, so you absolutely must clean them after each use.”
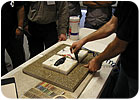
Once the pieces were level, Taylor used the roller nut on the Gorilla Grip to slightly open the seam. “You only want to open it wide enough to get the glue in,” he said. The adhesive used was E-Stone Bonder from Integra Adhesives, which supplies a translucent color chart to “take the guesswork out of choosing a color.” For this particular project, Beige Olimpio was chosen to best match the material.
The adhesive was applied using a dispenser gun system from Integra Adhesives. “Before you apply the adhesive, you want to purge a small bead at the tip, and after applying it, you work the adhesive in with a putty knife,” Taylor explained. “Then you want to bring the pieces together and check that they’re level.
“Allow 15 minutes for the adhesive to set, and keep the grips on until it sets,” Taylor continued. “You can’t scrape [the excess] too early, or you will get ‘tear-out’ of the adhesive. Don’t rush it; when you’re waiting for the adhesive to set, you can mount your sinks and set the backsplashes. When [the adhesive] is no longer ‘gummy’, remove the clamp, and lightly use a razor blade to scrape off the excess. Once you feel it resisting or pulling the glue, discard the blade and get a new one.”
Aqua Mix Renue polishing cream was then used to essentially polish the adhesive.
Top polishing
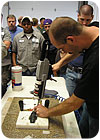
After the seam was set, Scott McGourley of Kasco Stone in Tampa, FL, demonstrated the top polishing technique. “Before you begin, you should set two 2 x 4s on the top [to contain the water],” he said. “It works better than a tape dam.”The first step in the process was to examine the surface. “You want to investigate the seam and keep in mind which parts need the most attention,” McGourley said. “Then you want to mark out the area where you will be working with White-Out.”
Using a hand grinder, the polishing begins with a 200-grit pad to mill down the lippage. “If there is a lot of lippage, you stay on the high side of the seam,” McGourley said, adding that the grinder should be set in the proper position before being started, and then it should be worked in a circular pattern. “The center of the pad is hollow, so you have to continually move back and forth. If the White-Out still exists, you’re not done yet. Don’t go too far past the edge, though, or you can round it off.”
McGourley said that the best way to determine if the lippage is gone is to simply run your finger along the area. “The important thing is not to rush,” he said. “If you rush past a step, chances are you’ll have to come back and do it over again.”
The grinder was running at 2,000 rpm, although McGourley said that speed is not critical for the process.
The next step was to use a 500-grit turbo pad, which basically removes the scratches from the 200-grit pad. Once again, the area to be worked is marked, and the tool should be worked “back and forth as well as up and down,” McGourley said. “You can take your time with the 500-grit, since it won’t cause any waves. They can only happen when you’re using a 400-grit or below. Keep varying your movement so you don’t get any lines. Now you’re looking for consistency; there shouldn’t be any visible scratches or ‘half-moons.’ “
Another important step is to use the grinder to “feather out” the area around the seam. “There should be no sharp contrasts,” he said, adding that it is also necessary to dry the work area between each step.
Next, McGourley attached a 1,000-grit pad to the grinder. “This is the money pad,” he said. “It will remove all scratches without dimpling the stone. Once you’re done with the 1,000-grit, you’re done with the turbo pads.”
Using a 1,000-grit, 4-inch Alpha Ceramica pad, McGourley finished the seam using a “wet-to-dry” technique. “You’re going to be adding more water as it starts to grab, and you’re working your way down the seam,” he said. “Placing your body weight on the tool helps it to go faster.”
In addressing the fabricators in attendance at the workshop, McGourley said that the specific techniques and pads used can vary depending on the material. “I basically see how far a pad will take me,” he said. “It can be different for all stones. The key is making sure you are going wide enough and feathering it out so you have color consistency.” A 3-inch buff pad was used to continue feathering out the area around the seam.
Another consideration is how much water should be used during the process. “Water management is key,” McGourley said. “If you use too much, the pad will not bite and be effective.”